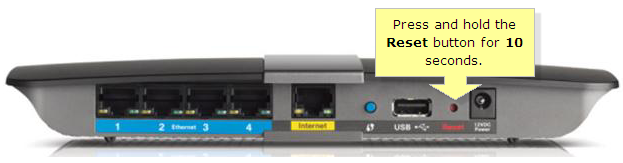
If this process do not help you. Free To call me on my Tollfree :- 1-800-986-6406Visit Our Site Click Here And Get Free Diagnosis For PC or Router Problem..
Despite the ease of setting up, don't be fooled. Just because you've plugged everything in and it seems to be working doesn't mean your network's performance and security are as good as they could be. I'll give you give you the basic steps you need to follow to properly configure your home router.
Selecting a Router
By far the most important element of your home network is the router. So it's worth investing time researching your options before deciding on one. A good place to start looking would be our
Best Wireless Routers article, which is chock-full of great networking hardware.
As globalitdoc.com readers, most of you doubtless have some type of home network already. Depending on your router's age, you don't necessarily need to upgrade to new hardware. As long as it functions reliably and supports WPA2 encryption, it should be fine. However, there are significant performance improvements to be found in the latest generation of routers, so it's worth considering an upgrade if you are worried about network speed. If your router is more than a few years old, you may only have WEP for security—if so, upgrade right away. WEP is no longer secure.
If you received a router from your ISP, here's a word of warning. Large ISPs such as Time Warner Cable and Verizon typically provide customers with routers as opposed to modems. The majority of these routers are not as feature-rich as some of the routers you could purchase on your own. Also, some ISPs make it difficult for customers to access the configuration interface. Some ISPs even charge you extra if you want to use certain features. For example, Time Warner Cable here in New York charges users for turning on the router's built-in Wi-Fi network.
One last caveat—even though most routers work just fine with any wireless device, you may need to pair the router with a wireless adapter optimized for that model to achieve the best performance. Check your documentation to see if your router falls into this category.
Getting Online
Now that you have a router, you need to get it connected and online. If your service provider gave you a modem when they activated your Internet service, this should be pretty simple. Just follow these steps:
- Turn off your modem,
- Unplug the modem's Ethernet cable from the PC,
- Connect that cable to the WAN or Internet port on your new router,
- Power on your modem (wait for a minute or two),
- Next power on your router (wait for a minute or two),
- Now use another Ethernet cable to connect the PC to your router's LAN port, and
- Turn on your PC.
By default, most consumer routers are set up to use DHCP to automatically assign an IP address to your computer. So if everything worked right, you should now be online.
If you are using an ISP-supplied router instead of a modem, things are a bit more complicated. First, you reconfigure the ISP's router to operate in bridge mode before you connect it to your new router. Bridge mode means the old router doesn't do anything to the network traffic and just passes it along to your new router for processing. While you can do this on your own, some providers will do it for you remotely once you make the request.
Once the ISP supplied router is in bridge mode, just follow the above steps to get your new router online.
Accessing the Management Console
With the router and PC physically connected, you can now begin customizing the router's configuration. Most routers these days are managed via a Web browser and are shipped using a default IP address, administrator account, and password. This default IP address will vary from vendor to vendor, so check your documentation to find out yours. Once you have that information, accessing the management console is easy.
- Launch your Web browser; it doesn't matter which one you use.
- Enter the router's IP address, which will look something like 192.168.0.1, into the browser's address bar and press Enter.
- You will see the router's login screen asking for the default administrator username and password. After you supply those credentials and press Enter, you should be looking at the management console.
Change the Password and Upgrade the Firmware
The very first thing you should do is change the router's default password. This may seem obvious, but you'd be surprised how many people don't do this. Not changing this puts the security of your entire network at risk and can leave your router exposed to literally anyone. Our story
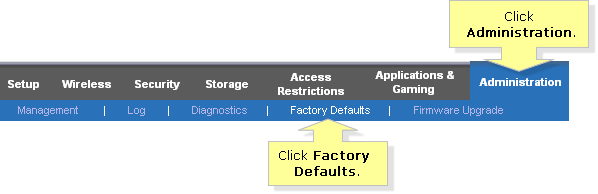
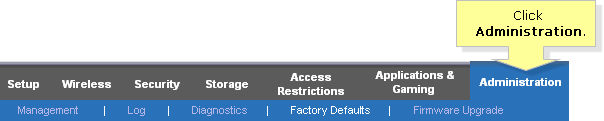
Is Your Home Router in the LizardSquad Botnet? can show you just how widespread this phenomemon is. On Netgear routers, the option for changing your password can usually be found under Administration\Set Password. Again, your router might be different, so check your documentation.
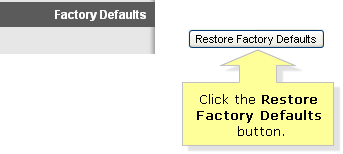
The next thing to do is to make sure your router is running the latest firmware released by the manufacturer. This is a good practice because you never know how long a product sat on a shelf before it made it into your hands. Also, firmware updates can address many potential issues before you ever encounter them. This process will vary by vendor; check your documentation for details.
Managing Your IP Addresses with DHCP
Next it's time to focus on your router's LAN configuration. As I previously mentioned,
DHCP, which manages all the IP addresses on your network, is typically enabled by default on most consumer routers. Your router uses the
IP address, a numeric identifier, to locate your PC and route the correct network traffic.
If the computer or mobile device does not already have an IP address, it will request one from the network's DHCP server, which is on the router. The DHCP server pulls an IP address from a pool of available IP addresses (called a
Scope) and assigns it to the device. When the device disconnects from the network, or a certain amount of time has passed (referred to as a lease) the IP address returns to the DHCP pool.
Certain devices, such as servers and printers, need to always have the same IP address. They can't have their addresses change periodically. If you are in that situation, you need to assign a static IP address, an IP address that never goes in the DHCP pool and is assigned to the device permanently. To make static IP addresses available, we exclude some IP addresses from the DHCP scope so they can be assigned manually.
To set the DHCP scope, follow these steps:
- Log in to the router's management console and look for a heading like LAN Setup (or something similar). Here you should see your LAN's IP address and subnet mask, along with a section for the DHCP server.
- Assign a range of IP addresses for the DHCP server to use. Assuming your router's IP address is 192.168.0.1 and you wanted to assign 50 IP addresses to the DHCP scope, you would set the Starting IP address to 192.168.0.2 and the Ending address to 192.168.0.51.
Working With Static IPs
Now that you have some IP addresses available, you'll need to manually assign them to devices which need static addresses. What you need to do is to provide the network adapter of your device with a unique IP address, the network Subnet Mask, the Gateway address and a DNS server address. Based on the above example, you could use any address between 192.168.0.52 and 192.168.0.254 for the IP address and 255.255.255.0 for the Subnet Mask. The Gateway and DNS address is the same as the router's IP address; which is 192.168.0.1.
Just be sure to keep a list of the static IP addresses you've assigned already so that you don't reuse them again by mistake. The process for assigning a static IP address to a network adapter will vary based on the device you're trying to configure, so check your documentation.
Activating Your Wi-Fi
With your network now properly configured you can move on to setting up your wireless network. This is actually very simple and should only take you a couple of minutes. When you do this, make sure you use a computer that is connected to the network via an Ethernet cable. If you try to configure Wi-Fi over wireless, you'll lose the connection to the management console whenever changes to the configuration are applied.
Now follow these steps:
- Go into the router's management console and locate the section titled Wireless Setup. It might be labeled differently depending on your router, but it should be pretty obvious which one it is.
- The wireless network should be enabled by default, but if it isn't, turn it on. If you have a dual-band router, you should see the configuration settings for both the 2.4GHz and 5GHz networks. Both need to be configured independently.
- Next make sure the Channel is set to Auto and leave the Mode in its default setting. You can adjust these settings later if you feel the network is sluggish or if you're experiencing dropped connections.
- This brings us to the SSID. The SSID is the name of your wireless network. You can name the network just about anything you want, and you definitely should not leave it set to the default value. Something descriptive is always good. For instance, we might use something along the lines of PCM24 and PCM50. PCM24 would be the name assigned to the 2.4GHz network and PCM50 would be the name assigned to the 5GHz network. PCM of course stands for PCMag.
- The final step is to set the encryption your Wi-Fi network will use. There are a few choices here. The only one you're interested in using is WPA2.
- There might be a few WPA2 options listed, but you want the one listed as WPA2-PSK [AES]. This is the highest level of wireless security currently available. Some routers still offer WEP. Do not use it, as it is vulnerable to brute-force attacks.
- Once you've set your encryption type to WPA2, assign a Passphrase (aka passcode or key). This Passphrase needs to be between 8 and 63 characters long and should be made up of letters (both upper and lowercase), numbers and characters (@#$%&). The longer the key, the more secure. Passphrases made up of random characters, such as hy*#Pnj125!ou, are the best, but if you have to use a name or something else familiar, make sure to mix it up with some numbers and characters as well (ex. P@$$word2015).
All that's left now is to save your configuration changes and test the connection. Your wireless devices should now be online.
Speaking of Security
Many routers support something called Wi-Fi Protected Setup or WPS. WPS is a network security standard that attempts to secure a home network easily via the press of a button. Please disable it. Researchers have found WPS can be vulnerable to brute-force attacks. For the marginal convenience it provides, WPS just isn't worth the potential for compromise.
As an additional security measure you can disable the SSID from broadcasting. By doing this you make the network undiscoverable to wireless devices that are looking for available wireless networks. This will hide your network from all wireless devices, including your own. In order to connect to your network, you'll need to enter in the SSID manually into each device. While this is by no means foolproof security, it will keep your network concealed from more casual users.
Depending on your router, the wireless configuration screen may include the option to enable a guest network. The Guest Network allows visitors to your home to get online while isolating them from the rest of the devices in your network. This is a useful option and we would recommend using it. Guest networks are available on both the 2.4GHz and 5GHz networks. Configure it the same way you did your regular wireless network, but be sure to assign it a different passphrase.
Sharing Your Data
One of the most important aspects of a home network is the ability to share network resources. There are a variety of ways to accomplish this. A server is the best solution, but not many home users will have one. Network Attached Storage or NAS devices are more cost effective and easier to use in this environment. To learn more about NAS devices, see our
The 10 Best NAS Devices. As an alternative, many routers have built-in USB ports which can be used to share hard drives or printers among all network users.
Windows PCs also allow you to share data among network users. There are a few different ways to accomplish this, but the simplest by far would be to use a HomeGroup. The HomeGroup is quick and easy to set up and allows you to share data with all or some network users. It can even be password protected. Microsoft posted a great tutorial on its site called
HomeGroup from start to finish, which will guide you through the entire setup process.